iFour Team - February 17, 2021

In this blog, we will be going to discuss how to simplify web API service calls to save function for beginners using xamarin. Xamarin is a cross-platform language for mobile applications. If you create the application using xamarin then you can easily run the application on any platform like windows, IOS, and Android. Xamarin source code is easy to administer, and large-scale applications are easy to develop and support.
If you are building an application with Xamarin and need to bind the data on the user side and store the data in the database, you can call the web API. To create a xamarin application that uses the web API, you need an HTTP client to send HTTP requests and receive an HTTP response.
There are several methods of the HTTP in the following:
1) GET – This method is used to retrieve data.
2) POST – This method is useful to insert the data in the database.
3) PUT – This method is useful to modify the data in the database.
4) PATCH – The patch method is used to apply partial modification of the database.
5) DELETE – This method is useful for removing the data in the database.
JSON is a text-based data interchange format that generates compact payloads and reduces bandwidth requirements while sending data. You have easily serialized and deserialize the message using the Newtonsoft Json.Net library in the xamarin.
Please try to follow these steps to create an android project and for calling web API using Xamarin.
Step 1: First create a new Android project for API calling using xamarin
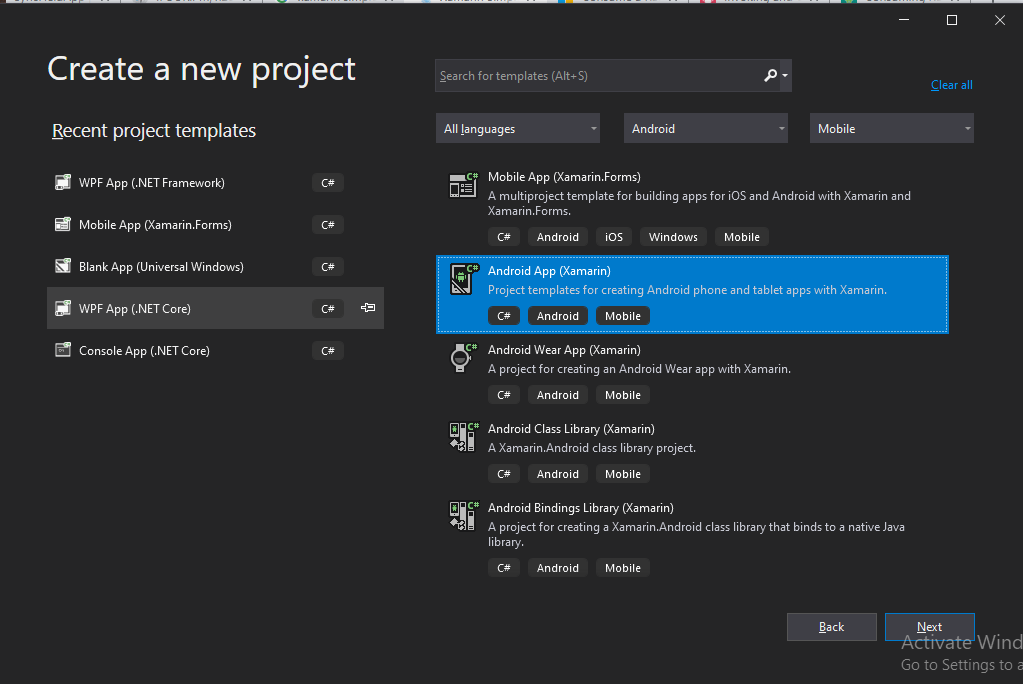
1. First select the Android option from the platform menu
2. Then select Android -app (Xamarin.Forms)
3. After that select the mobile option in the all type menu
4. Then select the directory to upload the project in location
5. Declare the unique name for your project and then click ok

Image 1: Create an Android Project.
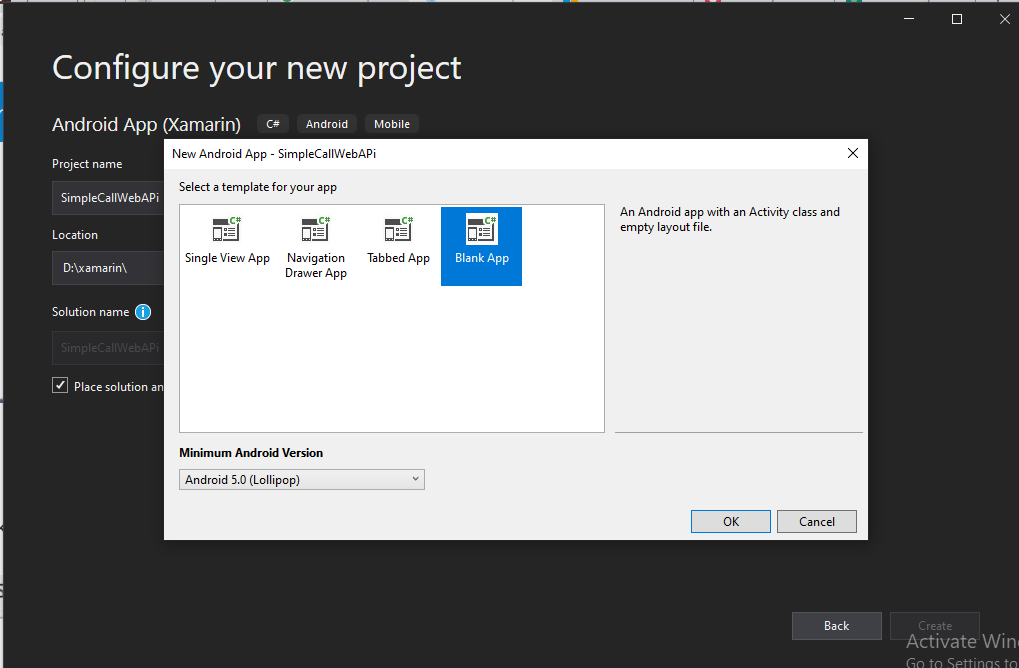
6.Select the blank template
7. Andthen press ok

Image 2: Add Location and Select a template.
Step 2: After creating the project you have to install the Manage NuGet packages.
Follow these steps for adding the NuGet packages:
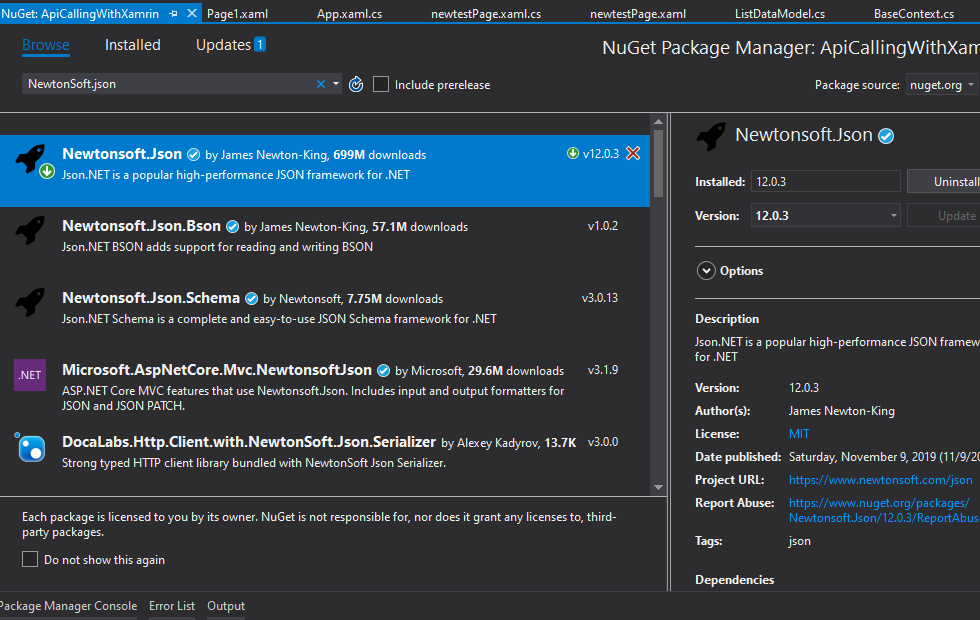
1) Right-click on solution explorer and select ManageNuGetPackages.
2) Then first click on the browser and search the NewTonSoft.Json and then install the packages.
3) Then install the packages of System.Net.Http, System.net, and System.Net.Http.WinHttpHandler.

Image 3: Install the Package of NewtonSoft.Json.
Step 3: Now create a new folder and assign its name as Model. After that create a class in the model and give the name as UserData.cs.
File Name: UserData.cs
Code:
using System;
    using System.Collections.Generic;
    using System.Linq;
    using System.Text;

    using Android.App;
    using Android.Content;
    using Android.OS;
    using Android.Runtime;
    using Android.Views;
    using Android.Widget;

    namespace SimpleCallWebAPi.Model
    {
    public class UserData
    {
    public intUserId{ get; set; }
    public string UserName{ get; set; }
    public string Mobileno{ get; set; }
    }
    }
Step 4: After creating the model class you have to make the design it using the xaml page.
File name: MainPage.xaml.
Code:
Step 5: After creating the design now you have bound the data using the web API.
File Name: MainActivity.cs
Code:
using Android.App;
using Android.OS;
using Android.Support.V7.App;
using Android.Runtime;
using Android.Widget;
using System.Net.Http;
using SimpleCallWebAPi.Model;
using Newtonsoft.Json;
using System.Net;
using System;
using System.Text;
using System.IO;
namespace SimpleCallWebAPi
{
[Activity(Label = "@string/app_name", Theme = "@style/AppTheme", MainLauncher = true)]
public class MainActivity :AppCompatActivity
{
protected override void OnCreate(Bundle savedInstanceState)
{
base.OnCreate(savedInstanceState);
Xamarin.Essentials.Platform.Init(this, savedInstanceState);
//Default set contentview
SetContentView(Resource.Layout.activity_main);
Button btnAdd = FindViewById
The HttpClient class is used for send and receive requests getting the HTTP. Provides functionality to send HTTP requests and receive HTTP responses from a URI-defined resource. Each request is sent as an asynchronous transaction. The HttpClient instance is declared at the class level so that the object can survive as long as the application needs to make HTTP requests. The HttpClient.GetAsync method is used for the send request using the GET method with URL and then retrieves the response from the web service.
Step 6: Now you have to add the button in the string.xaml file.
File Name: String.xaml
Code:
                SimpleCallWebAPi
                Settings
                Save
In this blog, we have explained how to streamline web API service call to save function for beginners using Xamarin. C# developer is easy to manage when developing Xamarin. Modifying the same method helps to set the response to the click event. We have explained the put method in above example. You have to implement the Get, Publish and Delete options using the xamarin. Hope this method helps you to make web API service calls in Xamarin Android app development.

January 23, 2023

September 21, 2021

September 20, 2021

July 23, 2021

July 06, 2021
Technology that meets your business requirements

Planning a cutting-edge technology software solution? Our team can assist you to handle any technology challenge. Our custom software development team has great expertise in most emerging technologies. At iFour, our major concern is towards driving acute flexibility in your custom software development. For the entire software development life-cycle, we implement any type of workflow requested by the client. We also provide a set of distinct flexible engagement models for our clients to select the most optimal solution for their business. We assist our customers to get the required edge that is needed to take their present business to next level by delivering various out-reaching technologies.


Get advanced technology that will help you find the
right answers for your every business need.

Get in touch
Drop us a line! We are here to answer your questions 24/7.