iFour Team - December 07, 2020

In this blog, we will be going to discuss about how to use the MVVM Cross library in xamarin forms. As you all know, MVVM is widely used design pattern nowadays. Basically, MVVM is employed in device-based development like WPF, Xamarin, Silverlight, etc. In this article, we will try to understand how to use the MVVM design model in Xamarin Form applications using the third-party library MVVMCross.
Basically, MVVMCross is the third-party library that permits your application to use the MVVM design pattern. We can install this third-party library using NuGet which we will see in this blog as well.
We all realize the MVVM design pattern, where you will acquire three main important parts of your application. They are View (View for User Interface), Model (Model use for Business logic), and ViewModel (Connection between View and Model). In short, when you do something in the View, the ViewModel learns your activity and runs the model to get the information when needed.
It comes back with the answers in its hand and notifies the view. You can imagine that the ViewModel bridge is the one responsible for all the right activities on the application. The view has no idea from where or which model the data will be fetched, and the Model has no idea to which view gets called. There is a separation in your application which is very important because you want your application to be loosely coupled and have less dependency over the objects, which slows down the performance.
As per Xamarin goes it's a few options to create cross-platform applications. That includes xamarin. ios, xamarin. android, and xamarin. forms. Usually, if you would like a cross-platform app with one UI code behind then xamarin. forms might be what you want. But today we will be going to use xamarin. android with a PCL (Portable Class Library) behind. We usually tend to stay our UI apart for various platforms and thus this route feels very nice.
There are two approaches to install the MVVM cross library in the project.
1)Using NuGet
2)Using Template
1) Using NuGet install the MVVM Cross library.
Use the following commands to install MVVMCross into your Xamarin.Forms application from Command Manager:
Command
Install-Package MvvmCross -Version 6.4.2
Install-Package MvvmCross.Forms -Version 6.4.2
2) Using Template
Using a template is the easiest method to use MVVMCross. So go to this Link and install the extension in your Visual Studio.
MVVMCross is a fully customizable code such as developer control servers that allow you to switch from ViewModel platform to ViewModel navigation with support for forwarding and returning built-in Reverse Control objects, dependency injection, and building add-on applications to drop and work with wizards and classes.
When a ViewModel is loaded a couple of events and methods will be triggered. You can use those to execute code that needs to happen in different situations. It will offer you more refined control of the ViewModel and therefore the state of its lifecycle. There could also be binding that you simply want to update or resources to wash up, and these lifecycle events can help thereupon.
                        public class MvvmLifecycleViewModel: MvxViewModel
                        {
                        public override void ViewAppearing(){}
                        public override void ViewAppeared(){}
                        public override void ViewDisappearing(){}
                        public override void ViewDisappeared(){}
                        }
First, you have to install the MVVM Cross library extension install in your visual studio to follow these steps below:
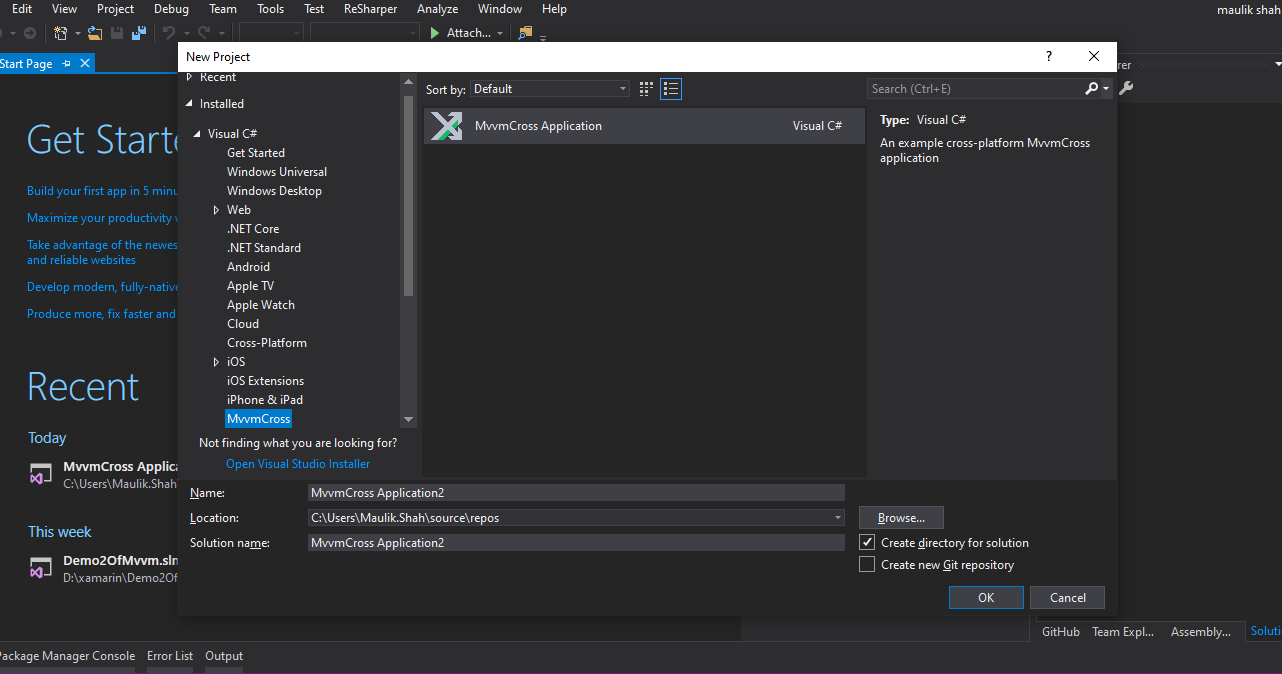
Step 1: First create a new project for MVVMCross library to follow the steps below.
1) First you have to search the MVVM Cross library in your project type and click MVVMCross library application.Then you have defined the project name and press the ok button to create a project.

Fig: Create an MVVMCross library project
Step 2: After creating the project you will see the solution below:.

Fig: Solution Explorer
Step 3: We are creating the project for UWP using this example. Create a new page for the user interface in the view folder.
File Name:FirstView.xamlCode:
                <views:mvxwindowspage d:designheight="300" d:designwidth="400" mc:ignorable="d" x:class="MvvmCross_Application1.UWP.Views.FirstView" xmlns="http://schemas.microsoft.com/winfx/2006/xaml/presentation" xmlns:d="http://schemas.microsoft.com/expression/blend/2008" xmlns:local="using:MvvmCross_Application1.UWP.Views" xmlns:mc="http://schemas.openxmlformats.org/markup-compatibility/2006" xmlns:views="using:MvvmCross.Uwp.Views" xmlns:x="http://schemas.microsoft.com/winfx/2006/xaml">
                <grid>
                <stackpanel>
                <textblock text="{Binding Hello, Mode=OneWay}">
                <textbox text="{Binding Hello, Mode=TwoWay, UpdateSourceTrigger=PropertyChanged}">
                                            </textbox>
                                        </textblock>
                                    </stackpanel>
                                </grid>
                            </views:mvxwindowspage>
Class FIle:FirstView.xaml.cs
Code:
                        using System;
                        using System.Collections.Generic;
                        using System.IO;
                        using System.Linq;
                        using System.Runtime.InteropServices.WindowsRuntime;
                        using Windows.Foundation;
                        using Windows.Foundation.Collections;
                        using Windows.UI.Xaml;
                        using Windows.UI.Xaml.Controls;
                        using Windows.UI.Xaml.Controls.Primitives;
                        using Windows.UI.Xaml.Data;
                        using Windows.UI.Xaml.Input;
                        using Windows.UI.Xaml.Media;
                        using Windows.UI.Xaml.Navigation;
                        using MvvmCross.Uwp.Views;
                        namespace MvvmCross_Application1.UWP.Views
                        {
                        public sealed partial class FirstView :MvxWindowsPage
                        {
                        public FirstView()
                        {
                        this.InitializeComponent();
                        }
                        }
                        }
Step 4:> Run the project to define the page in the Starup.cs file below.
Code:
                        using Windows.UI.Xaml.Controls;
                        using MvvmCross.Core.ViewModels;
                        using MvvmCross.Uwp.Platform;
                        namespace MvvmCross_Application1.UWP
                        {
                        public class Setup :MvxWindowsSetup
                        {
                        public Setup(Frame rootFrame) : base(rootFrame)
                        {
                        }
                        protected override IMvxApplicationCreateApp()
                        {
                        return new Core.App();
                        }
                        }
                        }
Step 5: You can initialize and register the model in this file.
Code:
                        namespace MvvmCross_Application1.Core
                        {
                        public class App :MvvmCross.Core.ViewModels.MvxApplication
                        {
                        public override void Initialize()
                        {
                        CreatableTypes()
                        .EndingWith("Service")
                        .AsInterfaces()
                        .RegisterAsLazySingleton();
                        RegisterAppStart
                            ();
                            }
                            }
                            }
Step 6: > Output of the project below:

Everything looks similar once you work with Xamarin or without MVVMCross. However, to form sure you have got enabled MVVMCross in your app, check the project structure, which is far away the simplest structure because core defines your Xamarin forms project and native projects will haveAndroid and iOS at the top of the project. Basically, you will notice the CoreApp class inherited from MvxApplication. This is how you will have to check if your application has MVVMCross enabled.
When using MVVMCross, you will need the main project where all the shared logic between platforms will be included and a selected project for each platform. Thus, a project which will work on Android, iOS, and Windows Phone will have a minimum of fourprojects. To use MVVMCross is super simple. Just install the MVVMCross. StarterPack package in each one of your projects and it will create a minimal structure to start your project.

January 23, 2023

September 21, 2021

September 20, 2021

July 23, 2021

July 06, 2021
Technology that meets your business requirements

Planning a cutting-edge technology software solution? Our team can assist you to handle any technology challenge. Our custom software development team has great expertise in most emerging technologies. At iFour, our major concern is towards driving acute flexibility in your custom software development. For the entire software development life-cycle, we implement any type of workflow requested by the client. We also provide a set of distinct flexible engagement models for our clients to select the most optimal solution for their business. We assist our customers to get the required edge that is needed to take their present business to next level by delivering various out-reaching technologies.


Get advanced technology that will help you find the
right answers for your every business need.

Get in touch
Drop us a line! We are here to answer your questions 24/7.